
B. Fitur GUI
- Mengonversi skrip menjadi aplikasi sederhana:
- Gunakan Live Editor untuk mengonversi skrip menjadi aplikasi sederhana yang memiliki kontrol interaktif yang memungkinkan orang lain bereksperimen dengan variabel dalam kode Anda.
- Buat aplikasi secara interaktif, App Designer adalah lingkungan interaktif yang mengintegrasikan dua tugas utama pembuatan aplikasi: meletakkan komponen visual dan memprogram perilaku aplikasi.

- Buat aplikasi secara terprogram, dengan menulis kode sendiri


Contoh Apilikasi dengan GUI
Pada saat kita membangun sistem fuzzy dengan fuzzy logic toolbox, maka kita harus melakukan editing yang meliputi: Jumlah Masukan/Keluaran, Klasifikasi Masukan/Keluaran, Jenis MF Masukan/Keluaran, Rule, Metode Defuzzyfikasi, dst.
Ada 5 GUI tools yang dapat dipergunakan untuk membangun, mengedit, dan mengobservasi sistem penalaran, yaitu :
· Fuzzy Inference System (FIS) Editor
· Membership Function Editor
· Rule Editor
· Rule Viewer
· Surface Viewer
Berikut ini merupakan contoh aplikasi pemrograman logika fuzzy untuk sistem pengatur kecepatan mesin menggunakan sensor suhu dan sensor cahaya sebagai masukan.
Langkah-langkahnya adalah sebagai berikut:
1. Menyusun konsep sistem kontrol dengan logika fuzzy
Misalnya keadaan sensor suhu (input 1) dibagi menjadi lima kategori yaitu:
INPUT 1 | |
SUHU | KETERANGAN |
Dingin | 0 0C – 15 0C |
Sejuk | 11 0C – 25 0C |
Normal | 21 0C – 30 0C |
Hangat | 28 0C – 40 0C |
Panas | 36 0C – 50 0C |
keadaan sensor cahaya (input 2) dibagi menjadi tiga kategori yaitu:
INPUT 2 | |
CAHAYA | KETERANGAN |
Gelap | 0 Cd– 35 Cd |
Normal | 31 Cd– 85 Cd |
Terang | 81 Cd- 100 Cd |
keadaan kecepatan mesin (output) dibagi menjadi tiga kategori yaitu:
OUTPUT | |
KEC. MESIN | KETERANGAN |
Lambat | 0 m/s– 15 m/s |
Sedang | 11 m/s – 21 m/s |
Cepat | 19 m/s – 45 m/s |
aturan /rules adalah sebagai berikut:
No. | INPUT | OUTPUT | |
SUHU | CAHAYA | KEC. MESIN | |
1 | Dingin | Gelap | Lambat |
2 | Dingin | Normal | Lambat |
3 | Dingin | Terang | Lambat |
4 | Sejuk | Gelap | Lambat |
5 | Sejuk | Normal | Lambat |
6 | Sejuk | Terang | Sedang |
7 | Normal | Gelap | Sedang |
8 | Normal | Normal | Sedang |
9 | Normal | Terang | Sedang |
10 | Hangat | Gelap | Sedang |
11 | Hangat | Normal | Cepat |
12 | Hangat | Terang | Cepat |
13 | Panas | Gelap | Cepat |
14 | Panas | Normal | Cepat |
15 | Panas | Terang | Cepat |
2. Setelah konsep sistem kontrol dibentuk, maka kita dapat membuat pemrogramannya. Ketiklah “fuzzy” pada command window untuk membuka jendela Fuzzy Inference System (FIS) editor, sehingga muncul tampilan seperti gambar di bawah ini:
3. Pilih edit >> add variable >> input untuk menambah variable input
sehingga akan muncul tampilan seperti pada gambar di bawah ini:
3. Ubahlah nama input1 menjadi suhu, input2 menjadi cahaya dan output1 menjadi kec_mesin
4. Pilih edit >> membership function untuk membuat fungsi keanggotaan setiap variabel
sehingga akan muncul tampilan Membership Function Editor seperti pada gambar di bawah ini: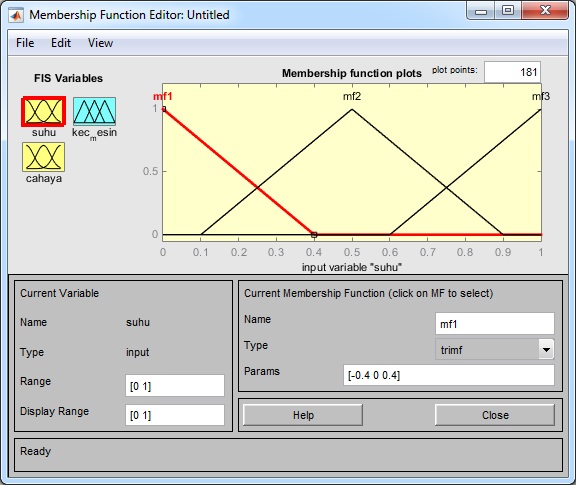
5. Pada variabel suhu, ubahlah
range menjadi [0 50],
nama mf1 menjadi dingin, type trimf, Params [0 0 15]
nama mf2 menjadi sejuk, type trimf, Params [11 18 25]
nama mf3 menjadi normal, type trimf, Params [21 25 30]
pilih edit >> add mfs untuk menambah membership function
nama mf4 menjadi hangat, type trimf, Params [28 34 40]
nama mf5 menjadi panas, type trimf, Params [36 50 50]
sehingga tampilan variabel suhu akan tampak seperti pada gambar di bawah ini:
6. Pada variabel cahaya, ubahlah
range menjadi [0 100],
nama mf1 menjadi gelap, type trimf, Params [0 0 35]
nama mf2 menjadi normal, type trimf, Params [31 50 85]
nama mf3 menjadi terang, type trimf, Params [81 100 100]
sehingga tampilan variabel cahaya akan tampak seperti pada gambar di bawah ini:
7. Pada variabel kec_mesin, ubahlah
range menjadi [0 50],
nama mf1 menjadi lambat, type trimf, Params [0 0 15]
nama mf2 menjadi sedang, type trimf, Params [11 15 21]
nama mf3 menjadi cepat, type trimf, Params [19 50 50]
sehingga tampilan variabel kec_mesin akan tampak seperti pada gambar di bawah ini:
8. Pilih edit >> rules untuk membuka jendela rule editor
buatlah aturan pada rule editor sesuai dengan konsep sistem kontrol yang sebelumnya telah dibuat. Misalnya if (suhu is dingin) and (cahaya is gelap) then (kec_mesin is lambat), dan seterusnya sampai dengan 15 rules.
9. Pilih view >> rules, untuk melihat hasil rules yang telah kita buat
kita dapat menggeser-geser nilai suhu (input1) dan cahaya (input2) sehingga menghasilkan nilai keluaran pada kec. mesin (output) 
10. Pilih view >> surface, untuk melihat grafik 3D antara suhu, cahaya, dan kec. mesin
sehingga akan muncul tampilan seperti pada gambar di bawah ini
11. Simpanlah FIS yang telah dibuat dengan cara mengklik file >> export >> to file
misalnya simpan dengan nama “mesin.fis”
12. Untuk mengecek hasil keluaran dari FIS yang telah dibuat, dapat kita lakukan dengan mengetik kode berikut pada command window:
1 2 | fis = readfis('mesin');output = evalfis([10 20],fis) |
Hasilnya adalah:
1 2 3 | output =6.2059 |
Nilai ini artinya: Jika suhu = 10 0C (dingin) dan cahaya = 20 Cd (gelap), maka kec. mesin = 6.2059 m/s (lambat)
Dapat disimpulkan bahwa hasil keluaran FIS sesuai dengan konsep sistem kontrol yang sebelumnya telah dibuat.
Kita dapat membuat tampilan program yang telah kita buat menjadi lebih interaktif menggunakan Graphical User Interface (GUI), seperti contoh GUI di bawah ini :
Listing program nya adalah sebagai berikut:
1 2 3 4 5 6 7 8 9 10 11 12 13 14 15 16 17 18 19 20 21 22 23 24 25 26 27 28 29 30 31 32 33 34 35 36 37 38 39 40 41 42 43 44 45 46 47 48 49 50 51 52 53 54 55 56 57 58 59 60 61 62 63 64 65 66 67 68 69 70 71 72 73 74 75 76 77 78 79 80 81 82 83 84 85 86 87 88 89 90 91 92 93 94 95 96 97 98 99 100 101 102 103 104 105 106 107 108 109 110 111 112 113 114 115 116 117 118 119 120 121 122 123 124 125 126 127 128 129 130 131 132 133 134 135 136 137 138 139 140 141 142 143 144 145 146 147 148 149 150 151 152 153 154 155 156 157 158 159 160 161 162 163 164 165 166 167 168 169 170 171 172 173 174 175 176 177 178 179 180 181 182 183 184 185 186 187 188 189 190 191 192 193 194 195 196 197 198 199 200 201 202 203 204 205 206 207 208 209 210 211 212 213 214 215 216 217 218 219 220 221 222 223 224 225 226 227 228 229 230 231 232 233 234 235 236 237 238 239 240 241 242 243 244 245 246 | function varargout = mesingui(varargin)% MESINGUI MATLAB code for mesingui.fig% MESINGUI, by itself, creates a new MESINGUI or raises the existing% singleton*.%% H = MESINGUI returns the handle to a new MESINGUI or the handle to% the existing singleton*.%% MESINGUI('CALLBACK',hObject,eventData,handles,...) calls the local% function named CALLBACK in MESINGUI.M with the given input arguments.%% MESINGUI('Property','Value',...) creates a new MESINGUI or raises the% existing singleton*. Starting from the left, property value pairs are% applied to the GUI before mesingui_OpeningFcn gets called. An% unrecognized property name or invalid value makes property application% stop. All inputs are passed to mesingui_OpeningFcn via varargin.%% *See GUI Options on GUIDE's Tools menu. Choose "GUI allows only one% instance to run (singleton)".%% See also: GUIDE, GUIDATA, GUIHANDLES% Edit the above text to modify the response to help mesingui% Last Modified by GUIDE v2.5 04-Oct-2013 22:13:32% Begin initialization code - DO NOT EDITgui_Singleton = 1;gui_State = struct('gui_Name', mfilename, ... 'gui_Singleton', gui_Singleton, ... 'gui_OpeningFcn', @mesingui_OpeningFcn, ... 'gui_OutputFcn', @mesingui_OutputFcn, ... 'gui_LayoutFcn', [] , ... 'gui_Callback', []);if nargin && ischar(varargin{1}) gui_State.gui_Callback = str2func(varargin{1});endif nargout [varargout{1:nargout}] = gui_mainfcn(gui_State, varargin{:});else gui_mainfcn(gui_State, varargin{:});end% End initialization code - DO NOT EDIT% --- Executes just before mesingui is made visible.function mesingui_OpeningFcn(hObject, eventdata, handles, varargin)% This function has no output args, see OutputFcn.% hObject handle to figure% eventdata reserved - to be defined in a future version of MATLAB% handles structure with handles and user data (see GUIDATA)% varargin command line arguments to mesingui (see VARARGIN)% Choose default command line output for mesinguihandles.output = hObject;% Update handles structureguidata(hObject, handles);movegui(hObject, 'center');% UIWAIT makes mesingui wait for user response (see UIRESUME)% uiwait(handles.figure1);% --- Outputs from this function are returned to the command line.function varargout = mesingui_OutputFcn(hObject, eventdata, handles)% varargout cell array for returning output args (see VARARGOUT);% hObject handle to figure% eventdata reserved - to be defined in a future version of MATLAB% handles structure with handles and user data (see GUIDATA)% Get default command line output from handles structurevarargout{1} = handles.output;% --- Executes on slider movement.function slider2_Callback(hObject, eventdata, handles)% hObject handle to slider2 (see GCBO)% eventdata reserved - to be defined in a future version of MATLAB% handles structure with handles and user data (see GUIDATA)% Hints: get(hObject,'Value') returns position of slider% get(hObject,'Min') and get(hObject,'Max') to determine range of sliderslider_suhu = get(hObject,'Value');set(handles.edit2, 'string', strcat(num2str(slider_suhu),' *C'));if slider_suhu <= 10 suhu = 'dingin';elseif slider_suhu > 10 && slider_suhu <= 20 suhu = 'sejuk';elseif slider_suhu > 20 && slider_suhu <= 27 suhu = 'normal';elseif slider_suhu > 27 && slider_suhu <= 35 suhu = 'hangat';else suhu = 'panas';endset(handles.text14, 'string', suhu);slider_cahaya = get(handles.slider3,'Value');input = [slider_suhu slider_cahaya];fis = readfis('mesin');out = evalfis(input,fis);if out <= 10 kec_mesin = 'lambat';elseif out > 10 && out <= 18 kec_mesin = 'sedang';else kec_mesin = 'cepat';endset(handles.edit4,'string',strcat(num2str(out),' m/s'));set(handles.text16, 'string', kec_mesin);% --- Executes during object creation, after setting all properties.function slider2_CreateFcn(hObject, eventdata, handles)% hObject handle to slider2 (see GCBO)% eventdata reserved - to be defined in a future version of MATLAB% handles empty - handles not created until after all CreateFcns called% Hint: slider controls usually have a light gray background.if isequal(get(hObject,'BackgroundColor'), get(0,'defaultUicontrolBackgroundColor')) set(hObject,'BackgroundColor',[.9 .9 .9]);end% --- Executes on slider movement.function slider3_Callback(hObject, eventdata, handles)% hObject handle to slider3 (see GCBO)% eventdata reserved - to be defined in a future version of MATLAB% handles structure with handles and user data (see GUIDATA)% Hints: get(hObject,'Value') returns position of slider% get(hObject,'Min') and get(hObject,'Max') to determine range of sliderslider_cahaya = get(hObject,'Value');set(handles.edit3, 'string', strcat(num2str(slider_cahaya),' Cd'));if slider_cahaya <= 30 cahaya = 'gelap';elseif slider_cahaya > 30 && slider_cahaya <= 80 cahaya = 'normal';else cahaya = 'terang';endset(handles.text15, 'string', cahaya);slider_suhu = get(handles.slider2,'Value');input = [slider_suhu slider_cahaya];fis = readfis('mesin');out = evalfis(input,fis);if out <= 10 kec_mesin = 'lambat';elseif out > 10 && out <= 18 kec_mesin = 'sedang';else kec_mesin = 'cepat';endset(handles.edit4,'string',strcat(num2str(out),' m/s'));set(handles.text16, 'string', kec_mesin);% --- Executes during object creation, after setting all properties.function slider3_CreateFcn(hObject, eventdata, handles)% hObject handle to slider3 (see GCBO)% eventdata reserved - to be defined in a future version of MATLAB% handles empty - handles not created until after all CreateFcns called% Hint: slider controls usually have a light gray background.if isequal(get(hObject,'BackgroundColor'), get(0,'defaultUicontrolBackgroundColor')) set(hObject,'BackgroundColor',[.9 .9 .9]);endfunction edit2_Callback(hObject, eventdata, handles)% hObject handle to edit2 (see GCBO)% eventdata reserved - to be defined in a future version of MATLAB% handles structure with handles and user data (see GUIDATA)% Hints: get(hObject,'String') returns contents of edit2 as text% str2double(get(hObject,'String')) returns contents of edit2 as a double% --- Executes during object creation, after setting all properties.function edit2_CreateFcn(hObject, eventdata, handles)% hObject handle to edit2 (see GCBO)% eventdata reserved - to be defined in a future version of MATLAB% handles empty - handles not created until after all CreateFcns called% Hint: edit controls usually have a white background on Windows.% See ISPC and COMPUTER.if ispc && isequal(get(hObject,'BackgroundColor'), get(0,'defaultUicontrolBackgroundColor')) set(hObject,'BackgroundColor','white');endfunction edit3_Callback(hObject, eventdata, handles)% hObject handle to edit3 (see GCBO)% eventdata reserved - to be defined in a future version of MATLAB% handles structure with handles and user data (see GUIDATA)% Hints: get(hObject,'String') returns contents of edit3 as text% str2double(get(hObject,'String')) returns contents of edit3 as a double% --- Executes during object creation, after setting all properties.function edit3_CreateFcn(hObject, eventdata, handles)% hObject handle to edit3 (see GCBO)% eventdata reserved - to be defined in a future version of MATLAB% handles empty - handles not created until after all CreateFcns called% Hint: edit controls usually have a white background on Windows.% See ISPC and COMPUTER.if ispc && isequal(get(hObject,'BackgroundColor'), get(0,'defaultUicontrolBackgroundColor')) set(hObject,'BackgroundColor','white');endfunction edit4_Callback(hObject, eventdata, handles)% hObject handle to edit4 (see GCBO)% eventdata reserved - to be defined in a future version of MATLAB% handles structure with handles and user data (see GUIDATA)% Hints: get(hObject,'String') returns contents of edit4 as text% str2double(get(hObject,'String')) returns contents of edit4 as a double% --- Executes during object creation, after setting all properties.function edit4_CreateFcn(hObject, eventdata, handles)% hObject handle to edit4 (see GCBO)% eventdata reserved - to be defined in a future version of MATLAB% handles empty - handles not created until after all CreateFcns called% Hint: edit controls usually have a white background on Windows.% See ISPC and COMPUTER.if ispc && isequal(get(hObject,'BackgroundColor'), get(0,'defaultUicontrolBackgroundColor')) set(hObject,'BackgroundColor','white');end |
refferensi : https://pemrogramanmatlab.com/2015/08/24/logika-fuzzy-untuk-sistem-pengatur-kecepatan-mesin/#more-1012
- Download File Materi [klik disini]
- Link Download Video Penjelasan Pengapilikasian GUI [klik disini]
Tidak ada komentar:
Posting Komentar